
Is your computer lagging, frying, or freezing up when you run FL Studio? I’ve identified everything you can do to make it run as quickly as possible. Here is a list of nine ways to make FL run lighter to get a boost in speed!
1. Choose Your Plugins Wisely
Every plugin you load into FL Studio will affect its performance. Even if you load up a plugin, and don’t use it, it’s gonna steal some of your performance.
Consider using FL Studios stock plugins. They are well optimized and take very little CPU compared to many other plugins. You may be surprised by just how light they are on your system. I opened 10 plugins on a fairly old laptop, and I only saw a 1-2% or so CPU increase.
2. Close Plugins You’re Not using
FL Studio will keep every plugin open as a window unless you close it. This always affects performance. In fact, this makes FL Studio a pretty messy DAW by nature.
Most other DAWs won’t let you have as many windows open as FL does. Consider closing everything you’re not using at the moment. Just hit the x at the top of every window.
3. Switch to Smart Disable
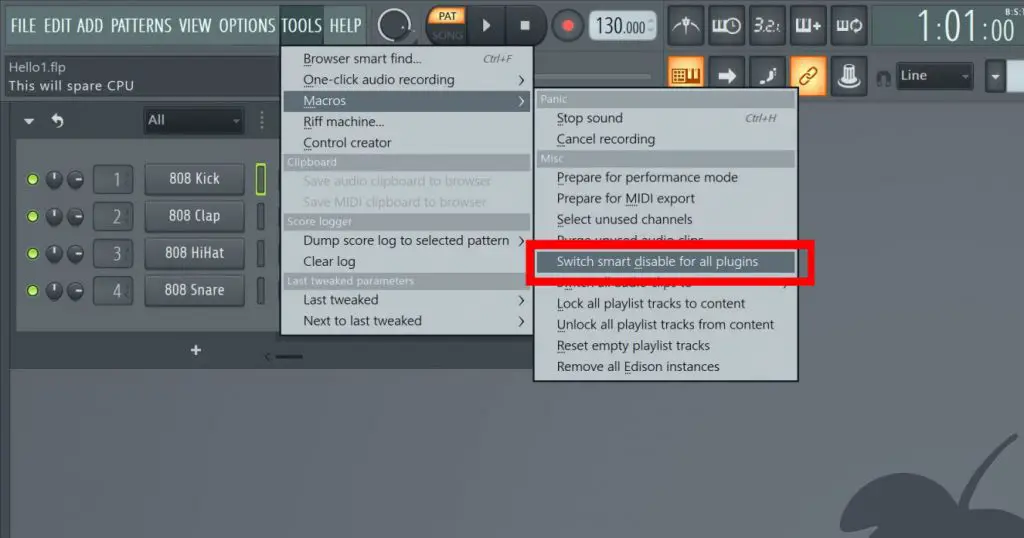
By switching to smart disable. You will temporarily deactivate every plugin that isn’t used until it is needed again. Maybe you added a few plugins, but you didn’t end up using them.
This will free up performance. Think of it as a quick clean-up. If you use a lot of plugins and channels. It can dramatically improve speed.
4. Increase Buffer Length
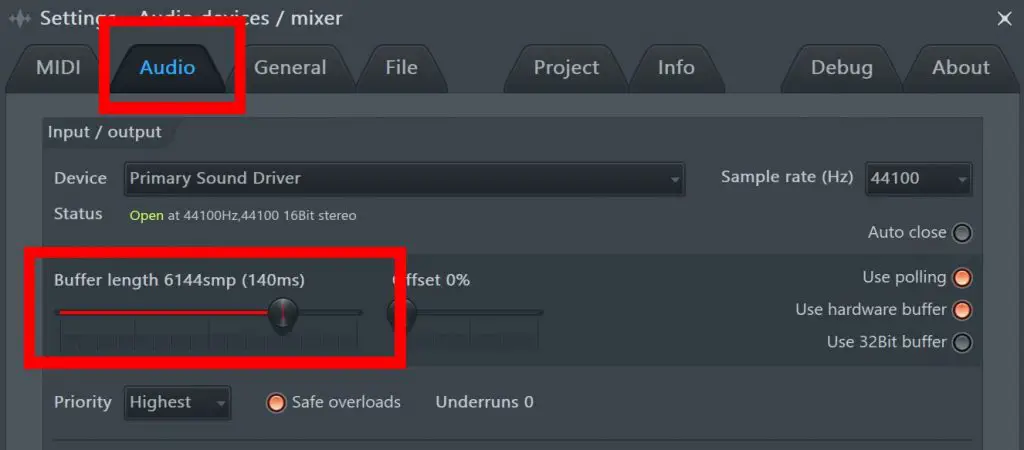
This is the most powerful setting for optimizing performance. It can be a pain in the ass to try to record audio with a high buffer length though. A higher buffer length means higher latency.
But if you’re not gonna record anything. At least, temporarily, go for the highest buffer length available to you. This will give your CPU time to handle requests, which means, you’ll get less stutter and less lag.
5. Turn Off Animations
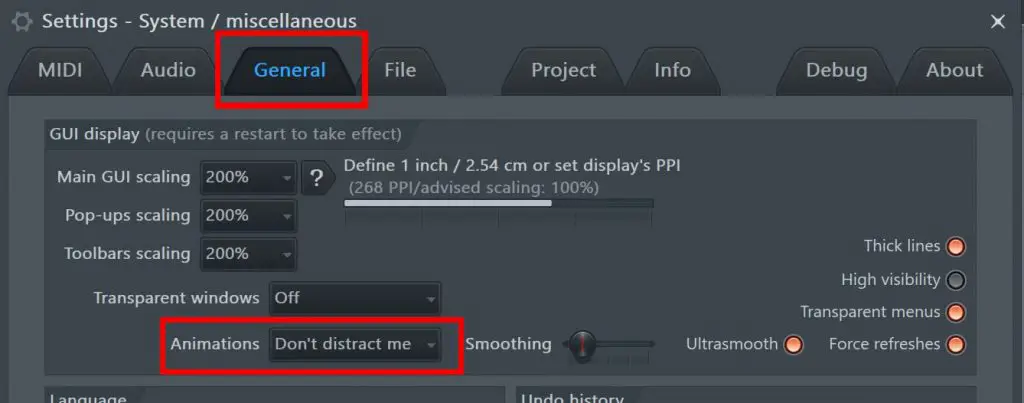
Options –> General Settings –> Animations: Don’t distract me
This is a small little tweak to get that extra little bit of performance. Just turn off the fancy animations.
6. Get an External Soundcard
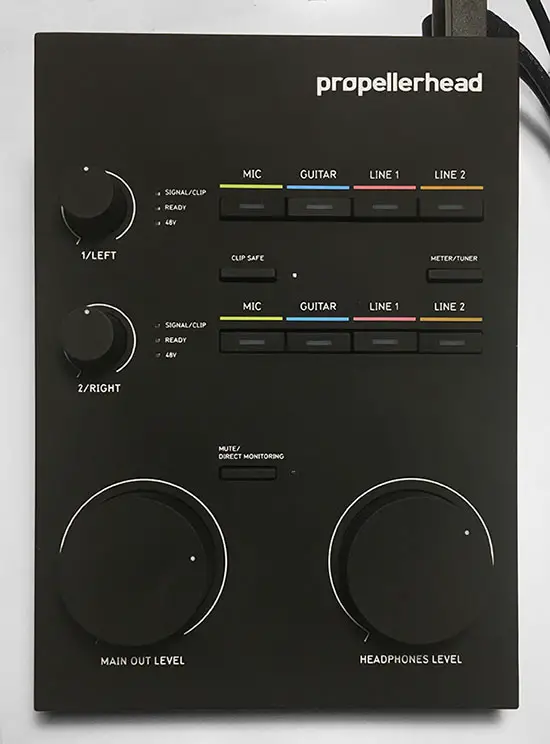
This is such a game-changer. I can’t recommend it enough. External soundcards will offload a lot of computing to the soundcard and give your computer/laptop a lot of breathing room.
You may not have to pay more than 70$ for it. You can even buy a used one for cheaper. It’s a solid investment for your studio, and it will greatly help with lag and freezing.
7. Switch Audio Drivers
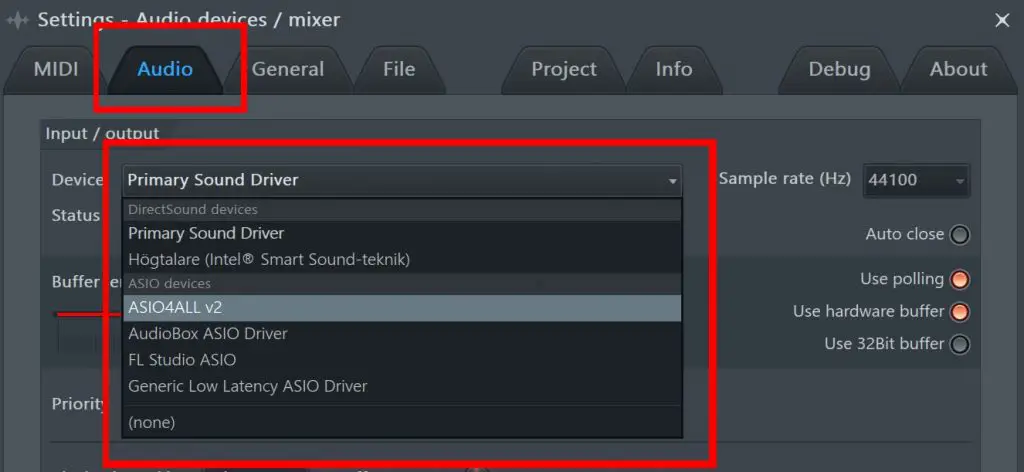
By switching audio drivers, you can get different performance results. You should have at least Asio4All as well as a Primary Sound card driver available. Be careful though. When you switch drivers you may get unwanted effects.
Turn down the audio on your computer, and if your using headphones, take them off, if you are using speakers, turn them down. The reason is.
Crazy things can happen with the audio, and you may get blasted with noise at a 100% volume if things go south. You want to protect your hearing. Trust me.
8. Optimize Your Operating System
This first thing I’m going to mention may be a no-brainer. But close down any software that’s not FL Studio. This will free up resources to give FL Studio a boost.
CCleaner and Advanced System Care are two applications that can help you with optimizing your computer safely even if you aren’t very handy with computers. They’re available for both Mac and Windows.
Now, at least on Windows. You can go way further than just closing down Chrome, discord, or Spotify. I’m talking about stopping Windows services that are running in the background and maybe even modifying your operating system to be lighter.
I however don’t recommend that if you’re not very handy with computers. Rule number 1 is to always have a backup. Seriously!
Only modify your system to be lighter if you can accept that it may break.
9. Purge Audio Clips and Select Unused Channels
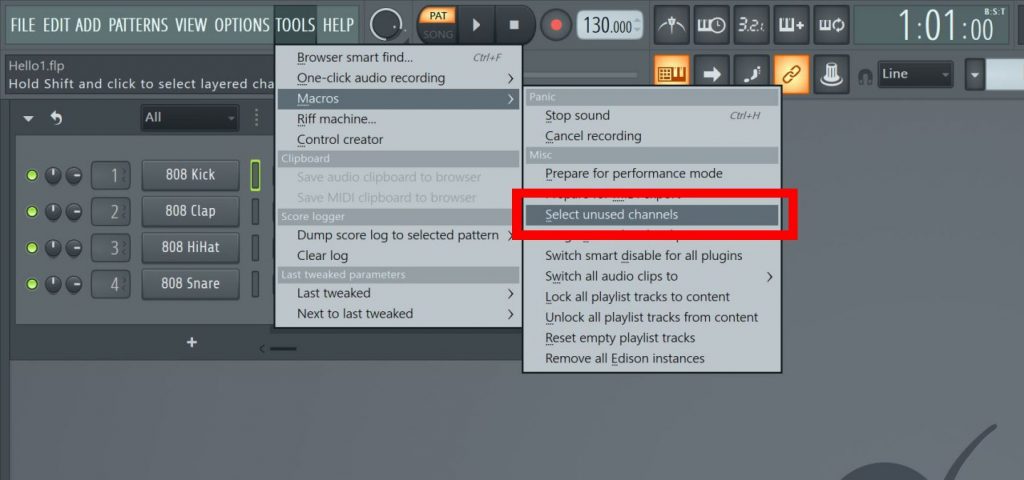
Purging audio clips and selecting unused channels are two great cleanup tricks. Purging unused audio clips simply means, removing any audio from your project, that is not in use.
Selecting unused channels will highlight the instruments and samples that you don’t use. Which makes it really easy to remove instruments and such that you don’t need.
Just go to Tools –> Macros –> Purge Unused Audio Clips / Select Unused Channels
That’s It!
If you have any more speed hacks. Let me know down in the comments! Also, if you’re suffering from FL Studio not outputting any audio, you can check this out.


